Another reason that Informix recoveries are simple is that the sysmaster database, physical log, and logical log are considered critical. In order to recover one of them, you have to recover all of them. In Oracle, for instance, there are four or five different recovery tactics that you can take, depending on which one of these objects is damaged. With Informix, there is only one recovery tactic.
The Informix recovery procedure does not assume that you know why your database went down. It does assume that you have been making backups via ontape or onbar. It also assumes that if you are using ontape, you know which tapes or files contain the latest level 0 and/or level 1 backups, as well as the location of all logical log backups since your last physical backup. If you are using onbar, this procedure assumes you know how to use your storage manager well enough that you know how to respond to its prompts for any media that may not be in an autochanger. In short, all media management is up to you.
The examples below use ontape. The example hostname is curtis, and the instance name is crash. The archives are being sent to disk files named /informix/logical/crash/crash.level.level.Z, and continuous backups are being sent to a disk file named /informix/logical/crash.log.
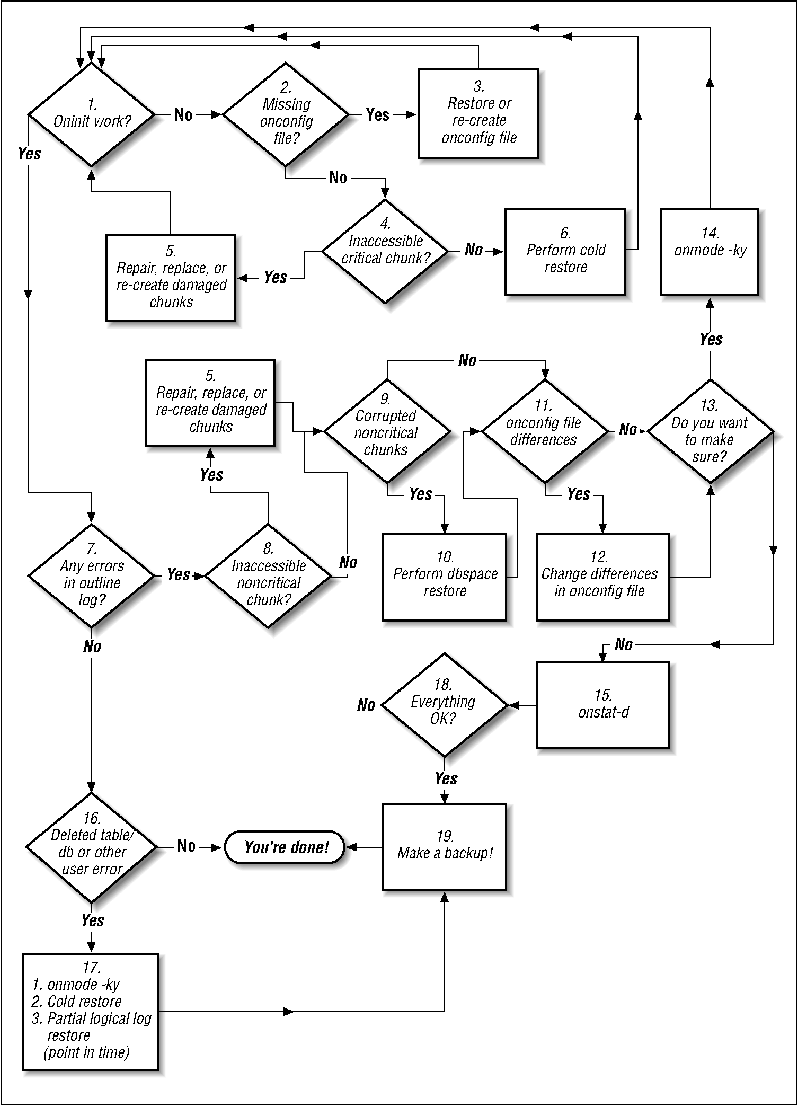
You should start with Step 1, "Does oninit work?"
The obvious first step in determining if an instance is in need of recovery is to try and start the instance. Do this by issuing the oninit command with no options. If it works, it just returns the prompt to you. You could also see one of two errors.
WARNING: Cannot access configuration file $INFORMIXDIR/etc/$ONCONFIG.
oninit: Cannot open chunk '/informix/rootdbs_mirror.dbf'. errno = 2
oninit: Fatal error in shared memory initialization
The oninit utility uses the onconfig file to determine the basic information needed to start the instance. This includes, but is not limited to, the following instance-specific information:
If you are running onbar, it can automatically recreate the onconfig file. However, if this file is the only one damaged, there's no need to do a full restore just to restore this file. Restoring or recreating it is easy enough.
If you are running infback.sh, it makes a backup copy of the onconfig file before it changes it. DBAs and other scripts often do the same. Look first to see if you have such a backup copy. If not, try to restore the file from the nightly filesystem backups. If you cannot find a backup copy, and cannot restore one from backup, you will need to recreate it. If any of the following objects is available, it will be easy:
>$INFORMIX/etc/$ONCONFIG
| strings |grep '^[A-Z][A-Z_]*' \
Step 4: Is there an Inaccessible or a Critical Chunk?
If an Informix instance will not start, the most common cause is a missing or corrupt critical chunk. (If a non-critical chunk is damaged the instance starts and records the problem to the online log file.) The error that you receive may look something like the following:
This step is necessary only if the physical file is somehow damaged. If it was a filesystem file, it might be deleted or its permissions changed. If it was a raw device, the disk drive could be damaged or missing, or its permissions could be wrong. Another problem could be that you are using a symbolic link to the real chunk, and the symbolic link was accidentally deleted.
If the missing file is a symbolic link, you simply need to restore or recreate the file in its original location. The only difficulty part is that Informix doesn't tell you which file it was symbolically linked to. Restoring the symbolic link from your regular filesystem backups is probably the easiest answer. Another method would be to consult any documentation that you may have about how you put the instance together. (Restoring from backup is obviously much easier.)
If it is not a symbolic link, the damaged file may be a filesystem file or raw device. If it is a filesystem file and the filesystem itself is intact, simply recreate a new file with the touch command. After doing so, make sure that the file is read/write for the informix user and informix group. If the filesystem is not intact, you need to relocate the file. Hopefully, you followed the common practice of using symbolic links to point to the actual chunks. If you did, you can recreate the chunk file anywhere on the system and just change the symbolic link to point to the new location. If you did not, you need to make a symbolic link in the original location to point to the new file.
For example, assume that the filesystem /data1 is destroyed, and it contained chunk /data1/rootdbs.dbf. However, you set up the Informix instance to point directly to /data1/rootdbs.dbf, instead of to a symbolic link to that chunk. You create a new file called rootdbs.dbf in /data2, but you have to tell oninit to use the new file. You need to unmount /data1 (although it probably is already) and create a symbolic link in the old location with the following command:
Before continuing, you may wish to verify that all chunks are all right. If you don't have a complete list of filenames, you can obtain them by running the strings command on a root dbspace chunk or a ontape archive:
| strings | grep '^/'
Permissions
/devices/iommu@f,e0000000/sbus@f,e0001000/espdma@f,400000
/esp@f,800000/sd@0,0:f
Both ontape and onbar allow you to specify a list of dbspaces to restore. This even works with critical dbspaces. However, if you restore just the critical dbspaces, the restore leaves all other chunks in an "inconsistent" state, as specified by the "I" flag that they display after the restore is done. Informix support does have a tool that will change this flag to consistent, but your mileage will vary on this one. If you are restoring a critical dbspace, you should really restore the whole thing.
An ontape restore with archives on disk always requires more than one window, and this section needs to show both windows below to fully demonstrate the example. To reduce confusion, it uses a regular paragraph like this one when switching windows. Since it still needs to explain the reasoning behind certain commands or answers within a window, it uses this font to do that. There is also a heading on each body of computer output specifying either Restore Window or Alternate Window. The restore window is the window where the ontape -r command is being run, and the alternate window will be the window where we perform other commands. We will start with Figure 13-20, the restore window.
#The first thing that we need to do is
#uncompress the archive files
curtis$ uncompress /informix/logical/crash/crash.level.*.Z
curtis$ ls /informix/logical/crash
crash.level.0 crash.level.1
#Now we need to remove the named pipe and replace it with a
#symbolic link
#to the actual backup file
curtis$ rm /informix/crash.level.0.fifo
curtis$ ln -s /informix/logical/crash/crash.level.0 /informix/crash.level.0.fifo
#Now we can begin the restore
curtis$ ontape -r
Please mount tape 1 on /informix/logical/crash/crash.level.0 and press Return to continue ...
Archive Tape Information
Tape type: Archive Backup Tape
Online version: INFORMIX-OnLine Version 7.23.UC4
Archive date: Thu Jan 21 00:57:14 1999
User id: informix
Terminal id: ?
Archive level: 0
Tape device: /informix/crash.level.0.fifo
Tape blocksize (in k): 16
Tape size (in k): 1024000
Tape number in series: 1
Spaces to restore:
1 [rootdbs ]
2 [plogdbs ]
3 [llogdbs ]
4 [testdbs ]
Archive Information
INFORMIX-OnLine Copyright(C) 1986-1995 Informix Software, Inc.
Initialization Time 03/04/98 20:08:25
System Page Size 2048
Version 4
Archive CheckPoint Time 01/21/99 00:57:17
Dbspaces
number flags fchunk nchunks flags owner name
1 2 1 1 M informix rootdbs
2 2 2 1 M informix plogdbs
3 2 3 1 M informix llogdbs
4 1 4 1 N informix testdbs
Chunks
chk/dbs offset size free bpages flags pathname
1 1 0 10000 9051 PO- /informix/rootdbs.dbf
1 1 0 10000 0 MO- /informix/rootdbs_mirror.dbf
2 2 0 5000 2447 PO- /informix/physlog.dbf
2 2 0 5000 0 MO- /informix/physlog_mirror.dbf
3 3 0 5000 3447 PO- /informix/logiclog.dbf
3 3 0 5000 0 MO- /informix/logiclog_mirror.dbf
4 4 0 500 191 PO- /informix/testdbs.dbf
#Ontape displays all this information to you so that you know
#that this is the right tape to restore the right instance.
#It doesn't actually do
#anything until you respond "y" to the next question.
Continue restore? (y/n)y
#Always say "YES" to this next question.
Do you want to back up the logs? (y/n)y
Please mount tape 1 on /informix/logical/crash.log and press Return to continue ...
Would you like to back up any of logs 65 - 67? (y/n) y
curtis$ cp crash.log crash.log.1999.01.21.17.04.00
curtis$ compress crash.log.1999.01.21.15.05.16
curtis$ ls -l crash.log.1999.01.21*
total 2424
-rw-rw---- 1 informix informix 73961 Jan 21 01:12 crash.log.1999.01.21.01.13.02.Z
-rw-rw---- 1 informix informix 1949 Jan 21 01:13 crash.log.1999.01.21.01.14.08.Z
-rw-rw---- 1 informix informix 557056 Jan 22 17:04 crash.log.1999.01.22.17:04:00.Z
Logical logs 65 - 67 may be backed up.
Enter the id of the oldest log that you would like to backup? 65
Please label this tape as number 1 in the log tape sequence.
This tape contains the following logical logs:
1 - 67
Log salvage is complete, continuing restore of archive.
#we do have a level one archive, so when it asks if we have one,
#we will answer "yes."
Restore a level 1 archive (y/n) y
Ready for level 1 tape
curtis$ rm /informix/crash.level.0.fifo
curtis$ ln -s /informix/logical/crash/crash.level.1 /informix/crash.level.0.fifo
Please mount tape 1 on /informix/logical/crash/crash.level.0 and press Return to continue ...
Archive Tape Information
Tape type: Archive Backup Tape
Online version: INFORMIX-OnLine Version 7.23.UC4
Archive date: Thu Jan 21 01:10:13 1999
User id: informix
Terminal id: ?
Archive level: 1
Tape device: /informix/crash.level.1.fifo
Tape blocksize (in k): 16
Tape size (in k): 1024000
Tape number in series: 1
#We do not have a level to archive, so we will answer no to
#following prompt.
Restore a level 2 archive (y/n) n
#We do want to restore log tapes, though...
Do you want to restore log tapes? (y/n)y
Roll forward should start with log number 65
curtis$ mv crash.log crash.log.1999.01.21.18.00.00
curtis$ compress crash.log.1999.01.21.18.00.00
curtis$ ls -l crash.log.1999.01.2*
total 2424
-rw-rw---- 1 informix informix 73961 Jan 21 01:12 crash.log.1999.01.21.01.13.02.Z
-rw-rw---- 1 informix informix 1949 Jan 21 01:13 crash.log.1999.01.21.01.14.08.Z
-rw-rw---- 1 informix informix 557056 Jan 22 17:04 crash.log.1999.01.22.17:04:00.Z
-rw-rw---- 1 informix informix 557056 Jan 22 18:00 crash.log.1999.01.22.18.00.00.Z
curtis$ zcat *1999* >crash.log
curtis$ chmod 664 * crash.log
Please mount tape 1 on /informix/logical/crash.log and press Return to continue ...
#Since we put all logs into this single log, there are no
#more logs to restore.
Do you want to restore another log tape? (y/n)n
Program over.
#The next step is very important. You must bring the
#instance online when you are done, or you will
#need to do the restore all over again.
curtis$ onmode -m
Make sure that you use onmode -m to bring the instance online after doing a cold restore. If you do not, you will need to completely redo the restore if you stop and start the instance before doing so.
The first and simplest recovery with onbar is to enter onbar -r. This specifies to do a complete restore of any offline dbspaces. It automatically performs the following three steps for you:
Unlike ontape, you do not even need to move files around or swap tapes if you have an autochanger. It automatically retrieves the appropriate volumes that it needs to write to or read from. Even if you do not have an autochanger, it prompts you for the appropriate tapes by name.
You also have the option of performing the three steps by yourself. This allows you to use a number of flags to do different kinds of restores based on your needs of the moment. The first thing you need to do, though, is issue the onbar -l -s command to salvage any logical logs that have not been backed up.
After doing that, you have a number of options when performing the physical and logical restores. (As started earlier, a physical restore is one that just reads the archive tape. It does not apply any logical logs. Applying the logical logs is called the logical restore. The following onbar command represents your options when beginning the physical restore. Please note the grouping of the options. The -p, -n and -t options are mutually exclusive, and so are the -w, dbspace_list and noflags options.
[ -p | -n xxx | -t time ] [ -w | dbspace_list | noflags ]
-p
onbar -r -l
Perhaps the instance started on your first try. Perhaps you needed to do a cold restore in order to get it started. The next thing to do would be to check the online log for any errors. Examples of the types of errors you may see are shown in Figure 13-27:
23:27:34 Who: Session(7, informix@curtis, 0, 169149316)
Thread(13, fast_rec, a12ccd8, 1)
23:27:34 Results: Cannot use TBLSpace page for TBLSpace 4194305
23:27:34 Action: Run 'oncheck -pt 4194305'
23:27:34 See Also: /tmp/af.d79e5
23:27:34 Cannot Open DBspace 4.
address chk/dbs offset size free bpages flags pathname
# Output abbreviated...
a12a508 4 4 0 500 191 PD- /informix/testdbs.dbf
If oninit is able to access all critical chunks, it brings the instance online. If any non-critical chunks are inaccessible, it just logs the problem in the online log. If, after checking the online log and running an onstat -d, you have verified that a non-critical chunk is inaccessible to Informix, you need to repair or replace it.
The best way to find out if your non-critical chunks are corrupted is to try to bring them online. In order to be able to do that, the following conditions must be true:
Warning: Bringing chunk back online.
Do you really want to continue? (y/n)y
Verifying physical disk space, please wait ...
Chunk status successfully changed.
There isn't much that can be said in this step that wasn't already covered in Step 6. However, there are a few differences between the restore discussed in Step 6 and this one:
$ onbar -r #Will recover all down dbspaces
$ onbar -r dbspace#Will recover any dbspaces listed
a12a508 4 4 0 500 191 PD- /informix/testdbs.dbf
curtis$ ontape -r -D testdbs
DBspace 'testdbs' is online; restoring 'testdbs' will bring all chunks
comprising the DBspace OFFLINE and will terminate all active
transactions and queries accessing the DBspace.
OK to continue?y
Please mount tape 1 on /informix/logical/crash/crash.level.0 and press Return to continue ...
Archive Tape Information
Tape type: Archive Backup Tape
Online version: INFORMIX-OnLine Version 7.23.UC4
Archive date: Thu Jan 21 00:57:14 1999
User id: informix
Terminal id: ?
Archive level: 0
Tape device: /informix/crash.level.0.fifo
Tape blocksize (in k): 16
Tape size (in k): 1024000
Tape number in series: 1
Continue restore? (y/n)y
Spaces to restore:1 [testdbs ]
Restore a level 1 archive (y/n) n
Do you want to restore log tapes? (y/n)y
Roll forward should start with log number 65
Please mount tape 1 on /informix/logical/crash.log and press Return to continue ...
Do you want to restore another log tape? (y/n)n
Program over.
curtis$ onstat -d|grep testdbs.dbf
a12a508 4 4 0 500 191 PO- /informix/testdbs.dbf
If you were forced to use an old onconfig file backup, or create one from scratch, you may have some potentially wrong values. Depending on which values are wrong, they may prevent the instance from operating properly. If so, oninit logs them in the online log.
02:14:46 Onconfig parameter MIRROROFFSET modified from 1 to 0
This one is about as easy as they come. Change any bad values in the onconfig file back to their original values. For example, if you saw the errors displayed in Step 11, you need to change LTAPEBLK to 32 and MIRROROFFSET to 1. Unfortunately, most of these values are read only at startup.
If you changed any values in Step 12, you need to restart the instance to have oninit read the new values. Also, depending on the number of steps that you had to follow to get to this step, you may want to make sure that everything will start correctly the next time. The only way to be sure of that is to restart the instance now.
If you had to do any restores to get to this step, make sure that you bring the instance online before you take it offline again. To make sure that it is online, run the following command:
INFORMIX-OnLine Version 7.23.UC4 -- On-Line -- Up 00:00:29 -- 8976 Kbytes
If you don't restart the database, you should make doubly sure that all dbspaces and chunks are online. To do so, run the command onstat –d, as shown in Figure 13-29:
INFORMIX-OnLine Version 7.23.UC4 -- On-Line -- Up 00:06:45 -- 8976 Kbytes
Dbspaces
address number flags fchunk nchunks flags owner name
a12a100 1 2 1 1 M informix rootdbs
a12a790 2 2 2 1 M informix plogdbs
a12a800 3 2 3 1 M informix llogdbs
a12a870 4 1 4 1 N informix testdbs
4 active, 2047 maximum
Chunks
address chk/dbs offset size free bpages flags pathname
a12a170 1 1 0 10000 9307 PO- /informix/rootdbs.dbf
a12a248 1 1 0 10000 0 MO- /informix/rootdbs_mirror.dbf
a12a358 2 2 0 5000 2447 PO- /informix/physlog.dbf
a12a5e0 2 2 0 5000 0 MO- /informix/physlog_mirror.dbf
a12a430 3 3 0 5000 3447 PO- /informix/logiclog.dbf
a12a6b8 3 3 0 5000 0 MO- /informix/logiclog_mirror.dbf
a12a508 4 4 0 500 191 PO- /informix/testdbs.dbf
4 active, 2047 maximum
P
Perhaps the instance started OK, but there is a different problem. If a DBA accidentally deleted a dbspace, or a user accidentally deleted an important table, there is really only one way to recovery that -- a point-in-time restore.
In order to do a point-in-time restore, you need to do a cold restore of the entire database. (Details on how to do that are in Step 6.)
If you are using ontape, you will need to apply all logical logs until you reach the one during which the user/DBA error occurred. Do not apply that logical log.
If you are using onbar, you can use the -n xxx or -t time features of onbar -r to recover up to a point in time just prior to the user/DBA error.
Every restore should be followed immediately by a full backup. Of course, Informix allows you do so online. Don’t consider the restore finished until you have completed this backup.